Halloween Candy Apples: How to Make these Adorable Ghost Apples

Halloween is just around the corner, and it’s time to get creative in the kitchen with some ghoulishly delightful treats. One of the most beloved Halloween classics is the caramel apple, but why stick with the ordinary when you can make extraordinary Halloween caramel apples that will thrill both kids and adults? In this blog post, I’ll share several recipes for Halloween candy apples. To start, I’ll share how I made these White Chocolate Covered Apple Ghosts using striped straws. Then, I’ll share other spooktacular recipes for Halloween apples that will make your celebration extra special. Whether you’re hosting a Halloween party, trick-or-treating with the kids, or just want to indulge in some seasonal sweets, these Halloween apple treats are sure to be a crowd favorite.
History of Candy Apples
Candy apples, also known as toffee apples or caramel apples, have a rich and delightful history that dates back over a century. The origin of these sweet treats can be traced to the early 20th century in the United States. In fact, candy apples were created as a clever marketing ploy to boost sales of apples during the autumn season.
A New Jersey candy maker named William W. Kolb is often credited with inventing the candy apple in 1908. He was experimenting with ways to use excess red cinnamon candies from Christmas sales when he decided to dip apples in the hot candy mixture. The result was a glossy, sweet, and crunchy coating that not only enhanced the flavor of the apple but also turned it into a festive and eye-catching treat. Candy apples quickly became a staple at fall fairs, carnivals, and Halloween celebrations, symbolizing the transition from summer to autumn and delighting generations of candy lovers ever since. Today, candy apples remain a beloved tradition during the Halloween season, embodying the sweet nostalgia of years gone by.
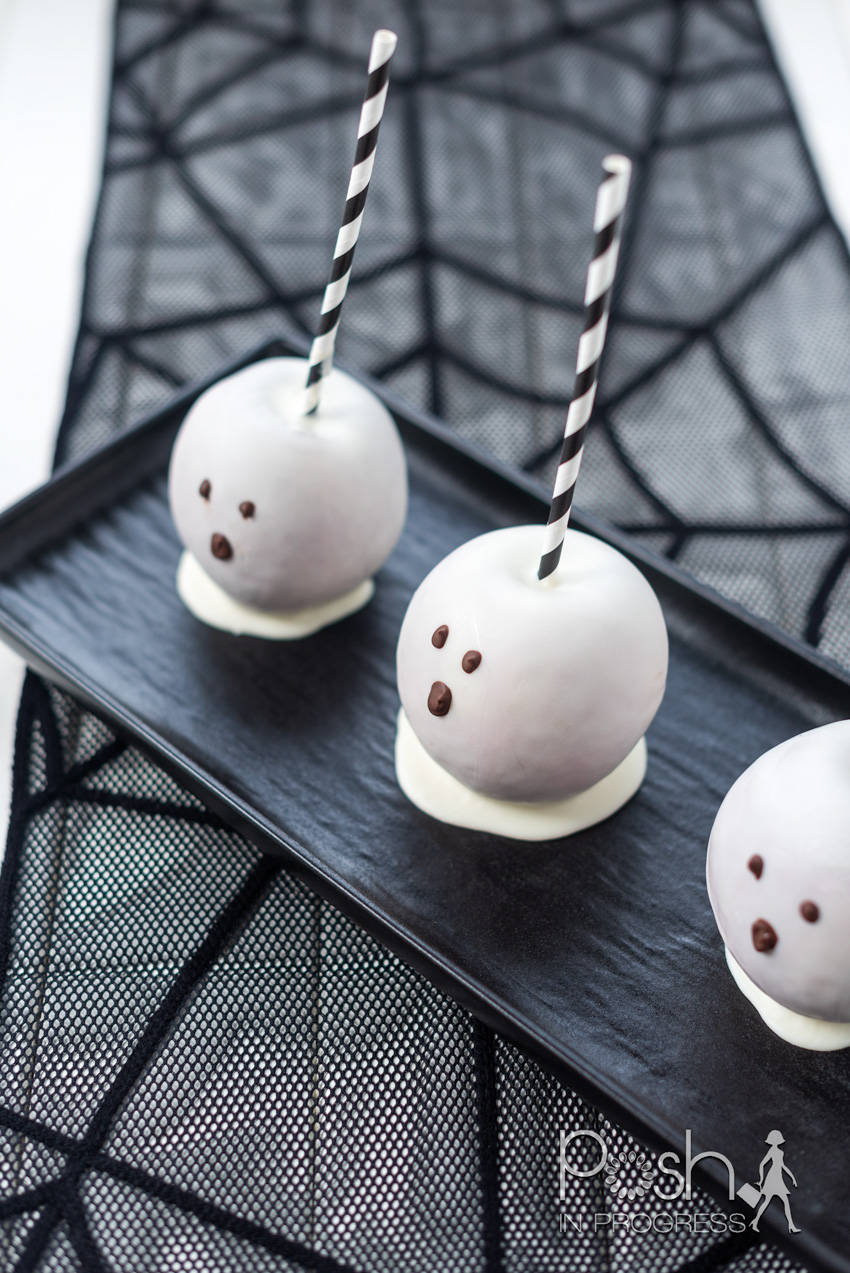
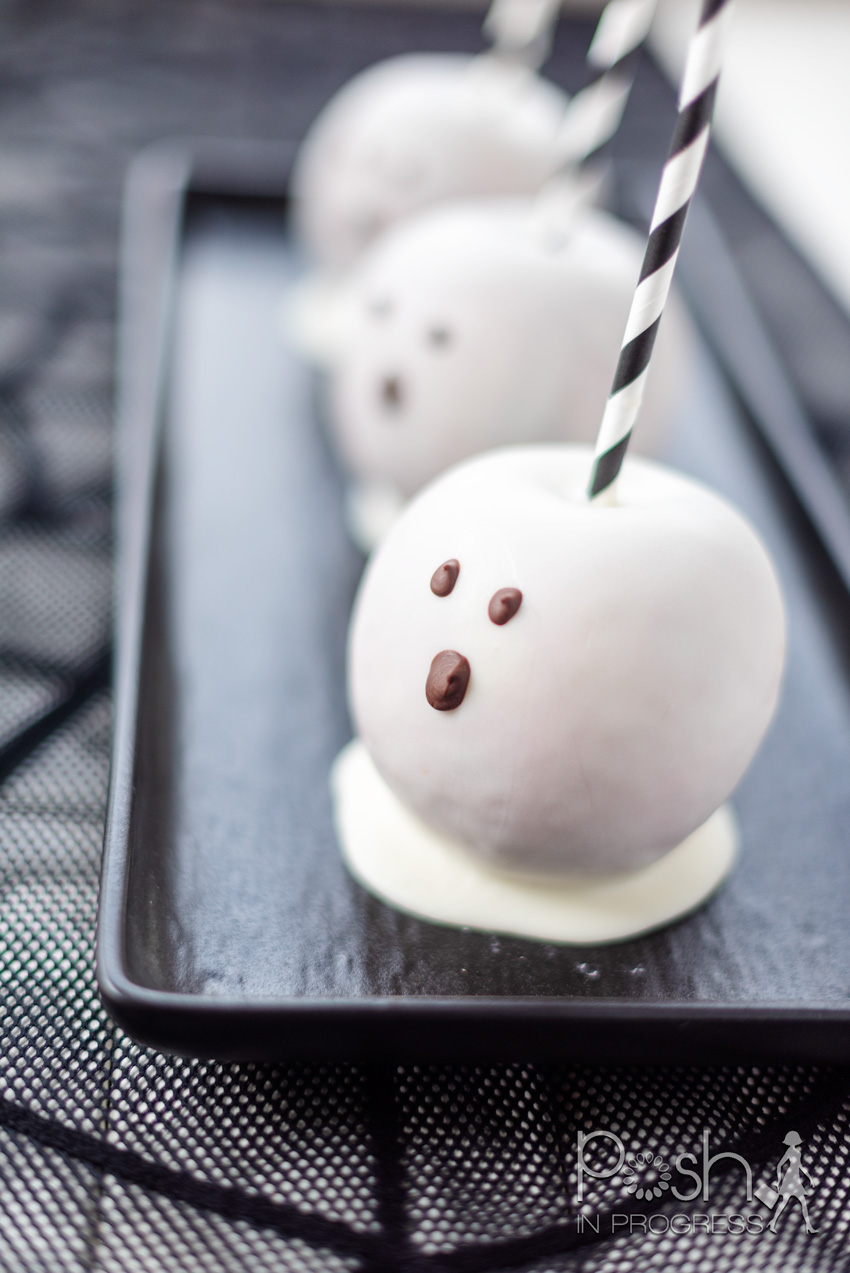
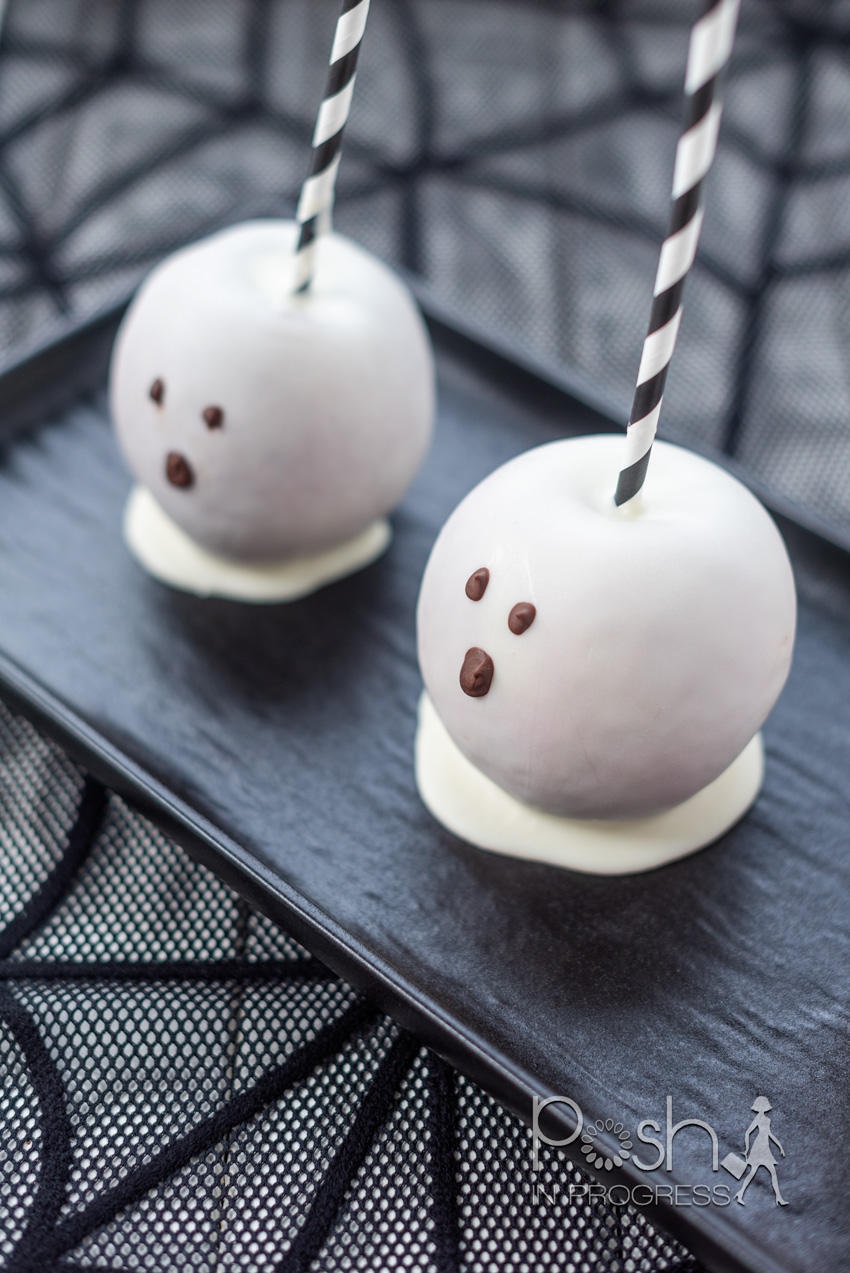
White Chocolate Covered Apple Ghosts
Let’s start with the star of the show – White Chocolate Covered Apple Ghosts! These adorable treats are easy to make and are guaranteed to be a hit at your Halloween gathering. Here’s what you’ll need:
Ingredients:
6 medium-sized apples (choose firm and crisp varieties)
12-16 ounces of high-quality white chocolate chips or melting wafers
Black candy melts or melted dark chocolate for decorating
Striped paper straws (black and white work great for Halloween)
Instructions:
Prepare the Apples: Wash and dry the apples thoroughly. Remove the stems and insert a striped paper straw into the top of each apple. Ensure they are secure but not piercing through the bottom. You can use a wood skewer and then cover that with the straw for a sturdier stick.
Melt the White Chocolate: In a microwave-safe bowl or using a double boiler, melt the white chocolate chips or wafers until smooth. Stir occasionally to prevent burning.
Coat the Apples: Dip each apple into the melted white chocolate, turning and swirling to coat evenly. Allow any excess chocolate to drip off.
Set the Ghostly Base: Place the dipped apples on a parchment paper-lined baking sheet and allow them to cool slightly. This will create the ghostly base for your decorations.
Create the Ghost Faces: Once the white chocolate has set but is not completely hardened, use black icing or melted dark chocolate to create spooky ghost faces on each apple. You can make different expressions, from smiling ghosts to spooky ones. I used a zip-top bag, added the melted dark chocolate, and cut the tip of the bag to pipe the faces.
Chill and Serve: Refrigerate the apples for about 30 minutes to let the chocolate fully set. Once they are ready, serve them at your Halloween gathering or enjoy them as a fun snack!
Halloween Candy Apples: How to Make these Adorable Ghost Apples
Adorable Halloween Candy Apple Ghosts

Ingredients
- 6 medium-sized apples (choose firm and crisp varieties)
- 12-16 ounces of high-quality white chocolate chips or melting wafers
- Black candy melts or melted dark chocolate for decorating
- Striped paper straws (black and white work great for Halloween)
Instructions
- Prepare the Apples: Wash and dry the apples thoroughly. Remove the stems and insert a striped paper straw into the top of each apple. Ensure they are secure but not piercing through the bottom. You can use a wood skewer and then cover that with the straw for a sturdier stick.
- Melt the White Chocolate: In a microwave-safe bowl or using a double boiler, melt the white chocolate chips or wafers until smooth. Stir occasionally to prevent burning.
- Coat the Apples: Dip each apple into the melted white chocolate, turning and swirling to coat evenly. Allow any excess chocolate to drip off.
- Set the Ghostly Base: Place the dipped apples on a parchment paper-lined baking sheet and allow them to cool slightly. This will create the ghostly base for your decorations.
- Create the Ghost Faces: Once the white chocolate has set but is not completely hardened, use black icing or melted dark chocolate to create spooky ghost faces on each apple. You can make different expressions, from smiling ghosts to spooky ones. I used a zip-top bag, added the melted dark chocolate, and cut the tip of the bag to pipe the faces.
- Chill and Serve: Refrigerate the apples for about 30 minutes to let the chocolate fully set. Once they are ready, serve them at your Halloween gathering or enjoy them as a fun snack!
Classic Caramel Apples for Halloween
While White Chocolate Covered Apple Ghosts are adorable and delicious, classic caramel apples are always a Halloween favorite. Here’s a simple recipe for making them:
Ingredients:
6 medium-sized apples (again, choose firm varieties)
1 package of caramel candies (about 11 ounces)
2 tablespoons of water
Wooden popsicle sticks
Instructions:
Prepare the Apples: Wash and dry the apples thoroughly. Remove the stems and insert wooden popsicle sticks into the top of each apple.
Melt the Caramel: Unwrap the caramel candies and place them in a microwave-safe bowl with 2 tablespoons of water. Microwave in 30-second intervals, stirring each time, until the caramel is smooth and fully melted.
Coat the Apples: Dip each apple into the melted caramel, turning and swirling to coat evenly. Allow any excess caramel to drip off.
Set and Decorate: Place the caramel-coated apples on a parchment paper-lined baking sheet to cool. You can decorate them with Halloween-themed sprinkles, crushed cookies, or drizzle melted dark chocolate over them for extra flair.
Chill and Serve: Refrigerate the caramel apples for about 30 minutes to let the caramel set. Once they are ready, you can serve these classic Halloween caramel apples to your eager trick-or-treaters or party guests.
Toffee Apple Monsters
For a monstrously sweet twist on the traditional caramel apple, try making Toffee Apple Monsters. These cute and spooky treats are perfect for Halloween.
Ingredients:
6 medium-sized apples
1 package of toffee candies (about 10 ounces)
2 tablespoons of water
Edible googly eyes
Pretzel sticks for monster “hair”
Instructions:
Prepare the Apples: Wash and dry the apples, and insert wooden popsicle sticks into the top of each apple.
Melt the Toffee: Unwrap the toffee candies and place them in a microwave-safe bowl with 2 tablespoons of water. Microwave in 30-second intervals, stirring each time, until the toffee is smooth and fully melted.
Coat the Apples: Dip each apple into the melted toffee, turning and swirling to coat evenly. Allow any excess toffee to drip off.
Monster Eyes and Hair: Before the toffee sets, attach edible googly eyes and insert pretzel sticks into the top of the apples to create the “hair” of your monster apples.
Chill and Serve: Let the toffee-coated apples cool and set on a parchment paper-lined baking sheet in the refrigerator for about 30 minutes. Once set, your Toffee Apple Monsters are ready to be devoured!
Peanut Butter and Chocolate Covered Apples
If you’re a fan of the classic combination of peanut butter and chocolate, you’ll love these Peanut Butter and Chocolate Covered Apples with a Halloween twist.
Ingredients:
6 medium-sized apples
1 cup of peanut butter chips
1 cup of chocolate chips
Crushed peanuts or Halloween-colored sprinkles for topping
Instructions:
Prepare the Apples: Wash and dry the apples, and insert wooden popsicle sticks into the top of each apple.
Melt the Peanut Butter and Chocolate: In separate microwave-safe bowls, melt the peanut butter chips and chocolate chips in 30-second intervals, stirring each time until smooth.
Coat the Apples: Dip each apple into the melted peanut butter, turning and swirling to coat evenly. Let the excess peanut butter drip off.
Dip in Chocolate: After the peanut butter has set slightly, dip the apples into the melted chocolate, covering the peanut butter layer completely.
Sprinkle the Magic: While the chocolate is still soft, sprinkle crushed peanuts or Halloween-colored sprinkles over the apples for a festive touch.
Chill and Serve: Refrigerate the peanut butter and chocolate-covered apples for about 30 minutes until the chocolate sets. Then, enjoy these delightful Halloween treats with a nutty twist.
Classic Halloween Candy Apples
Here’s a classic recipe for making Halloween candy apples:
Ingredients:
6 medium-sized apples (choose firm and crisp varieties)
2 cups granulated sugar
1/2 cup light corn syrup
1/2 cup water
1/4 teaspoon red food coloring (optional for a traditional red candy apple)
1/2 teaspoon flavored extract (such as cinnamon or vanilla, optional)
Wooden popsicle sticks or craft sticks
Halloween-themed sprinkles or decorations (optional)
Instructions:
Prepare the Apples: Wash and dry the apples thoroughly. Remove any stems and insert wooden popsicle sticks into the top of each apple. Ensure they are secure but not piercing through the bottom.
Prepare a Baking Sheet: Line a baking sheet with parchment paper or a silicone baking mat. This will prevent the candy apples from sticking.
Make the Candy Coating: In a heavy-bottomed saucepan, combine the granulated sugar, light corn syrup, and water. If you want to color and flavor the candy coating, add the red food coloring and flavored extract at this stage.
Cook the Candy: Place the saucepan over medium-high heat and attach a candy thermometer to the side of the pan. Stir the mixture until the sugar dissolves. Once it starts boiling, stop stirring and let it cook until it reaches the hard crack stage, which is around 300°F (150°C). This should take about 20-25 minutes.
Dip the Apples: Once the candy mixture reaches the desired temperature, remove it from heat. Carefully dip each apple into the hot candy coating, tilting the pan as needed to cover the apple completely. Allow any excess candy to drip back into the saucepan.
Decorate (Optional): If you want to add Halloween-themed decorations, like sprinkles, do so immediately after dipping the apples while the candy coating is still tacky.
Set on the Baking Sheet: Place the coated apples onto the prepared baking sheet. Make sure they are not touching each other, as the candy coating will harden quickly.
Cool and Set: Allow the candy apples to cool and the candy coating to harden, which usually takes about 15-20 minutes.
Serve: Once the candy coating is completely set and hard, your Halloween candy apples are ready to be enjoyed! Serve them at your Halloween party or as a spooky treat for trick-or-treaters.
Storage: If you have any leftover candy apples, store them in a cool, dry place. It’s best to consume them within a day or two for the freshest taste and texture.
This Halloween, take your treat game to the next level by whipping up a batch of White Chocolate Covered Apple Ghosts, classic Caramel Apples, Toffee Apple Monsters, or Peanut Butter and Chocolate Covered Apples. These spooktacular Halloween apple treats are not only delicious but also a fun activity for the whole family. So, whether you’re hosting a Halloween party or just want to enjoy some homemade sweets, these recipes are sure to be a hit. Get creative, have fun, and have a Happy Halloween filled with delicious apple treats!
If you’re looking for other Halloween stories, click here. If you’re looking for other apple recipes, click here.

This site uses selective affiliate links, which means a commission is earned if you make a purchase via the link. The price you pay will be the same whether you use the affiliate link or go directly to the vendor’s website using a non-affiliate link.
Our editorial content is not influenced by advertisers or affiliate partnerships. We appreciate, and thank you for, your support!

.png)
