Blue Ombre Cake and DIY Cake Stencil
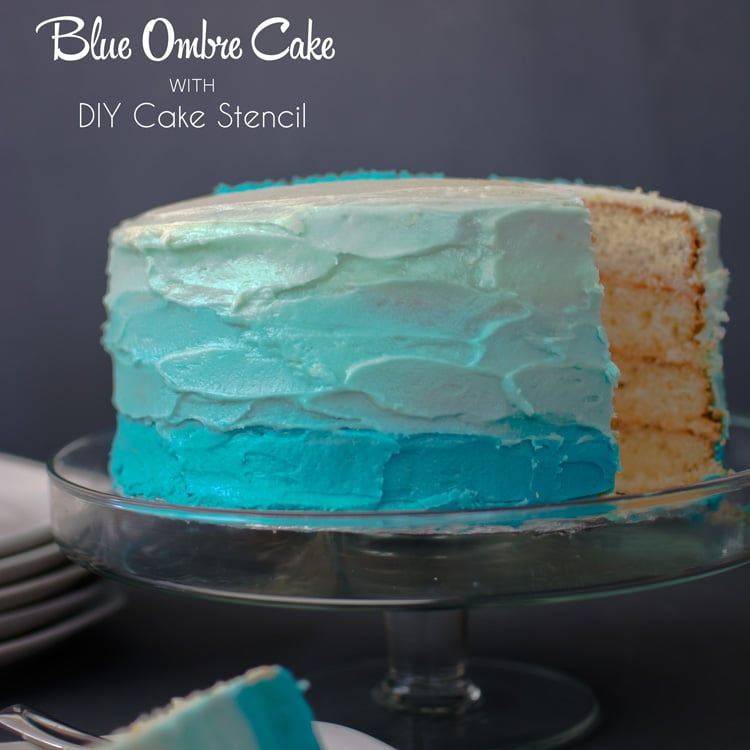
Posh In Progress turned 1 yesterday! To celebrate, I wanted to try something daring, a multiple layer cake with blue ombre frosting and our Posh logo.
Before I get into all the cake specifics, I want to thank my new and return readers, and especially those who have commented or connected with me via Facebook, Twitter and Instagram. I am always looking for feedback on the blog—so shoot me an email or comment on my posts to let me know how I’m doing.
I also want to thank Dermalogica and BittersweetsNY for co-sponsoring giveaways on the blog this year.
Finally, an extra special shout-out to my amazing husband, Jade, for all of his hard work on the website and putting up with my often emotional antics. We have a lot of exciting plans for the blog in the next year and we can’t wait to get started.
Now, onto the cake. Yeah, I’ve made layer cakes for birthdays before, but never more than two layers, and never with anything other than basic chocolate or vanilla frosting.

My original plan was to make two layers and then slice them in half for a four layer cake. The cake recipe I chose was supposed to make two 8-inch cakes. Since I only had 9-inch pans, I decided on a four-layer cake after the first two layers came out much thinner than I imagined.
The cake-making part wasn’t too complicated. This cake recipe is a little more advanced because it calls for separating the whites and yolks. The whipped egg whites add more volume and airiness to your cakes. The cake is moist and rich, but not too sweet, so it works well with the extra sweet buttercream frosting. A note about the frosting: my first batch of buttercream was a bit too runny and I used that for the crumb coating and the layers. Although it hardened just fine, it was a bit too thinner than I like for the middle layers. If you have trouble with the consistency of your buttercream, add more confectioner’s sugar to thicken and more milk to thin it out.

My original plan was to make this ombre cake, but it all seemed too complicated, so I chose a simpler version. I wanted a teal blues to represent our Posh In Progress color scheme. Wilton’s does make a teal food gel, but I didn’t order it in time so had to settle on sky blue instead.

Although my cake doesn’t look nearly as pretty as some of the other ombre cakes out there, I’m still proud of my novice homemade effort and especially love how the stencil turned out. It was a bit time consuming cutting through the plastic. The next time I make a stencil, I think I’ll try the wax paper version to save time (and avoid carpal tunnel).
.jpg)
.jpg)
I’ve included directions for making the cake and frosting, how to decorate the cake and also how to make your own homemade stencil. I hope all of the directions help you to create your own blue ombre cake with butter cream cake stencil.
White Butter Cake Recipe
Adapted from Joy of Baking
Ingredients:
4 large eggs, separated
3 ½ cups sifted cake flour
4 teaspoons baking powder
1/2 teaspoon salt
1 cup unsalted butter, at room temperature
2 cup granulated white sugar, divided
2 teaspoon pure vanilla
1 cup milk
1/4 teaspoon cream of tartar
Directions:
Preheat oven to 350 degrees and place rack in center of oven. Butter and flour four – 9 inch round cake pans. Line bottoms of pans with parchment paper and grease and flour parchment paper.
While eggs are still cold separate the eggs, placing the yolks in one bowl and the whites in another bowl. Cover the two bowls with plastic wrap and allow the eggs to come to room temperature before using (about 30 minutes).
In a mixing bowl sift or whisk together the flour, baking powder, and salt.
In bowl of electric mixer, beat the butter until soft (about 1-2 minutes). Add 1 ½ cups of the sugar and beat until light and fluffy (about 2-3 minutes). Add egg yolks, one at a time, beating after each addition. Scrape down the sides of the bowl. Add the vanilla extract and beat until combined.
With the mixer on low speed, alternately add the flour mixture and milk, in three additions, beginning and ending with the flour.
In a clean bowl of your electric mixer, with the whisk attachment, beat the egg whites until foamy. Add the cream of tartar and continue beating until soft peaks form. Gradually add the remaining ½ cup of sugar and continue to beat until stiff peaks form. With a rubber spatula gently fold a little of the whites into the batter to lighten it, and then fold in the remaining whites until combined. Do not over mix the batter or it will deflate.
Divide the batter evenly between the four prepared pans and smooth the tops with an offset spatula or the back of a spoon. Bake in the preheated oven for approximately 20 – 25 minutes, or until a toothpick inserted in the center of the cake comes out clean.
Cool the cakes in their pans on a wire rack for 10 minutes. Place a wire rack on top of the cake pan and invert, lifting off the pan. Once the cakes have completely cooled, wrap in plastic and place the cake layers in the freezer for at least an hour. (This is done to make filling and frosting the cakes easier.)
Vanilla Buttercream Frosting
Adapted fromThe Cupcake Project
Ingredients:
3 cups confectioners’ sugar, sifted
1 cup unsalted butter, room temperature
2 teaspoons vanilla extract
2 tablespoon milk
Directions:
Mix together sugar, butter, vanilla extract and milk until they are blended and creamy. If too runny, add more confectioner’s sugar until you reach the desired consistency. If too stiff, slowly add more milk until you reach the desired consistency. Separate your icing into two bowls, one for the cake layers and crumb layer, and one for the ombre decoration.

Blue Ombre Frosting Decoration
Adapted from Java Cupcake
Materials:
4 bowls
Wilton’s food coloring gel in Sky Blue
Tooth Pick
Spoon
Directions:
Separate your frosting into four bowls. Reserve one bowl of white for the top of the cake. Dip the tip of a toothpick into the food coloring and transfer a small amount of color to one of the bowls. Mix until combined. Repeat two more times, adding slightly more food coloring to each of the two bowls. Adjust the colors until you reach your desired level of color differentiation.
To decorate the cake, make sure all four layers are even on top and bottom. After freezing the layers for about an hour, I used a serrated knife to even out the tops of the cakes.
Place a cardboard round (I made a 9 inch round using cardboard and covered in tin foil) on a flat surface and place a large dollop of frosting on the center of the circle to hold the first layer in place. Place the first cake on the cardboard round, cut side down. Next, add a generous layer of butter cream to the top of the first layer, spread evenly across the layer and then top with another layer of cake, cut side down. Repeat two more times until you have all four layers stacked on top of one another. Adjust the layers to make sure the cake isn’t leaning and is as even on top as possible. If you notice your cake is not flat on top, you can either try to cut the layer to even it out, or add extra frosting between the 3 and 4th cake to try to even it out.
Next you will want to cover the outside of the cake with a crumb coat. Once you cover the entire cake, let it dry, uncovered (or in the refrigerator) until the frosting has dried completely.
When you are ready to decorate the cake with the ombre colors, first start with the darkest blue and frost around the entire bottom layer of the cake. I used about ¼ inch of frosting for the outside layer, although you can add however much frosting you like. I just like to make sure the cake is covered and you can’t see the cake through the frosting. Smooth as much as possible using an off-set spatula (I used this one). Repeat with the next darkest blue color around the second and half of the third layer, and repeat again with the lightest blue around the sides of the 3rd layer and the top layer. On the very top of the cake, frost with white and blend the top layer and the light blue layer as much as possible around the outside edges. Use your spatula to even out the layers and create a blended look between the layers.
DIY Cake Stencil
Adapted from Designer Stencils and All Things Thrifty
Materials:
Clear Plastic Folder
Directions:
Print out the desired image and tape the corners to the clear plastic folder. Trace the image on the other side with the sharpie. Use a plastic cutting board or piece of thick cardboard to cut out the image using the x-acto knife. If you have letters, like we did, make sure to pre-plan on how to keep the internal portion of the letter in-tact. For example, with our P, we had to keep two little pieces of plastic to hold in the circular top part of the P.
Once your image is cut out and your cake had had time to dry (overnight is even better), place the stencil on top of the cake in the desired location. Put a glob of the frosting on top of the stencil and using a plastic spatula, scrape down and out. Make sure not to move the stencil. Work your way from the middle of the stencil out until the entire stencil areas have been covered with a thin layer of butter cream. Once you think your image is complete, carefully life the stencil straight up off of the top of the cake. Ta da! You have a perfect stenciled cake!


This site uses selective affiliate links, which means a commission is earned if you make a purchase via the link. The price you pay will be the same whether you use the affiliate link or go directly to the vendor’s website using a non-affiliate link.
Our editorial content is not influenced by advertisers or affiliate partnerships. We appreciate, and thank you for, your support!